You can always simply grab the “Fix-A-Floor DIY Tile Kit” which comes with everything you will need for guaranteed professional results!
How to Fix Loose/Hollow Tile & Stone Floors:
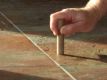
1. Locate loose or hollow problem areas by tapping with wooden dowel or broom handle, listening for the hollow problem areas. Mark entire perimeter of problem areas with chalk, tape or similar.
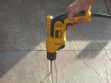
2. Using a masonry drill bit normally 1/8″, 3/16″ or 1/4″ whichever is LARGER that barely fits between the tiles without touching the tiles (larger holes make filling with the adhesive easier). Drill 2-3 holes on each side of the tile depending on tile size. Larger tiles require more holes to allow for ventilation. Drill STRAIGHT down into the grout lines inside the problem areas (do not contact tiles with drill bit). Once the drill bit clears the grout line you will feel it release meaning you have reached the void. This is far enough; do not drill into the sub floor!
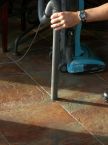
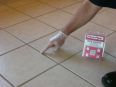
3. Vacuum over each hole to remove all loose dust and debris, preferably with a shop vac hose or hand extension end from a house vacuum to get maximum suction over each hole. Tapping lightly with a rubber mallet helps to loosen debris for better results.
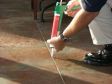
4. Insert the Fix-A-Floor tube tip into the drilled hole measuring for a snug fit. If hole is larger than 1/8″ then CUT the tip to fit snug into drilled hole ensuring the tip does NOT rest on the sub-floor promoting good flow! Unscrew the tip and pierce a hole (with an awl) on the top of the threaded tube cap and replace tip.
Using a quality caulking gun slowly squeeze Fix-A-Floor Repair Adhesive to fill each hole keeping tip pressed firmly into each hole. Be careful of spillage while moving from one hole to the next, place finger over tip. If one hole proves problematic simply move on to another nearby hole. Once the adhesive spills up and out of nearby holes this ensures penetration and filling of the problem area. Keep filling and empty tube to ensure complete coverage.
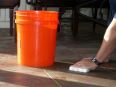
5. Place a 1/2 way filled 5 gallon bucket(s) of water or similar on subject areas. Be sure to clean up any excess Fix-A-Floor with sponge and water as necessary. Allow to cure for minimum of 24 hours.
6. Grout drilled holes by simply mixing a color matching grout into a medium consistency and fill/press into holes (usually with a finger). After 15-20 minutes use a damp cloth or sponge to smooth and blend onto existing grout. Allow to dry and wipe clean with a dry cloth and your floor is as good as new!!
How to Fix Loose & Creaky Wood Floors:
1. Inside the problem area use a 9/64” drill bit simply drill 1-2 holes normally on the knots or dark spots or on the jointsevery square foot or so. Do not drill through Sub-Floor!
2. DO NOT CUT TIP! Simply remove by unscrewing tip and pierce a hole on the top of the threaded tube cap (with an awl), screw tip back on and begin Filling…
3. You will see the Fix-A-Floor Repair Adhesive travel and spill up and out of the other holes. This ensures penetration and filling of the problem area. Once filled, wipe clean with damp rag/sponge and place buckets of water or similar on subject area. Allow to cure for 24 hours. Fix-A-Floor Repair Adhesive dries clear!
4. Visit your local flooring/home improvement store to locate wood filler to match floor color or darker for a knot appearance and fill holes.
How to Fix Loose & Hollow Marble Floors:
1. Locate loose or hollow problem areas by tapping with wooden dowel or broom handle, listening for the hollow problem areas. Mark entire perimeter of problem areas with chalk, tape or similar.
2. Using a 1/8″ masonry drill bit drill 2-3 holes on each side of tile, depending on tile size in the joints. Larger tiles require more holes to be drilled. Ream slightly. Do not drill into the sub floor!
3. Vacuum over each hole to remove all loose dust and debris, preferably with a shop vac hose or hand extension end from a house vacuum to get maximum suction over each hole. Tapping lightly with a rubber mallet helps to loosen debris for better results.
4. DO NOT CUT TIP! Simply remove by unscrewing tip and pierce a hole (with an awl), on the top of the threaded tube cap screw tip back on and begin Filling… Using a quality caulk gun squeeze Fix-A-Floor Repair Adhesive to fill each hole keeping tip pressed firmly into each hole. Be careful of spillage while moving from one hole to the next. Once the adhesive spills up and out of nearby holes this ensures penetration and filling of the problem area. Keep filling and empty tube to ensure complete coverage.
5. Place 5 gallon bucket(s) of water or similar on subject areas. Be sure to clean up any excess Fix-A-Floor with sponge and water as necessary. Allow to cure for minimum of 24 hours.
6. Grout drilled holes by simply mixing a color matching grout into a medium consistency and fill/press into holes (usually with a finger). After 15-20 minutes use a damp cloth or sponge to smooth and blend onto existing grout. Allow to dry and wipe clean with a dry cloth and your floor is as good as new!!
Guaranteed for the life of your Floor!
Fix loose and hollow tile, marble, stone & creaky wood floors with Fix-A-Floor Repair Adhesive/Glue. Creaky, loose wood floors? No problem… Fix your floor with Fix-A-Floor today! No more crunchy, hollow sounding tiles guaranteed!